
Project #3: Open Form
- Abby

- Apr 23
- 6 min read
"Project Description: In this project you will discuss the idea of Kitsch. Create at least 3 multiple scale hollow 3-4 " shapes out of clay. You will be using these multiples and a slab built clay form (4″ high x 6″ wide) to create your final object. The overall composition should be Dynamic using texture, color, and form! Be sensitive to the repetition and gesture of the pieces to direct the viewer’s eye movement throughout the composition."
It had been a long time since I got to work with clay, so before even starting on this project I made a mug. I discovered rather quickly that I did not like making things with a slab-based method. The slab would end up to thin, to thick, or just uneven. When the thickness would be just right the slab wouldn't be the right size to wrap around the base of the cup. After the first two attempts at this mug my frustration would only grow. Another issue would be that my clay was drying out more and more, making it harder to work with. I like pinch and coil pots much more. It took several attempts to make my mug, but after a bit of effort I eventually got a mug shape that I was happy with. After it had been fired the first time, I decided I didn't want to apply any underglaze before the regular glaze. I just went for it and I really like how it turned out.


I needed to first come up with a Kitsch object. I best defined something to be "kitsch" if it was something like a knickknack, trinket, or it was a "shelf-filler". In class it was also discussed how such items could/would be overproduced. In my apartment we have a wall full of shelves that my roommates and I have lovingly called "Trinketville" and that is where we put all of our knickknacks and trinkets. This would be a great place to look for something "kitsch" as we have many, many trinkets. It was there where I found some of my tiny resin ducks I had, and a small bottle of blue glass that had been from a gift shop many years ago.

I needed to make something out of clay for these ducks and their little bottle. These objects had to interact somehow with the clay piece and what better thing for ducks to interact with than a small puddle?

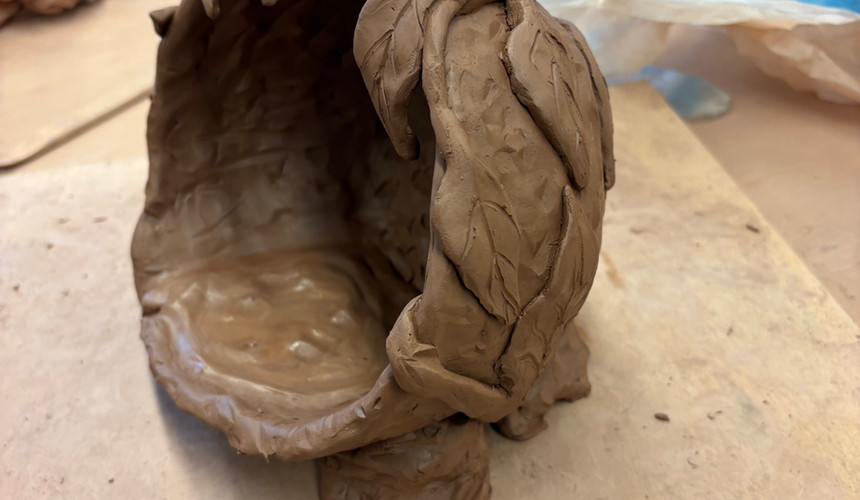
In this original draft I had intended for water to spill out of the bowl the puddle was in, although I ended up scrapping later on it due to time constraints. I wanted vines to be growing all along the bowl and for rocks to be propping it up. I wanted this bowl to feel like it had been left behind in the woods and that the ducks found it was the perfect size for them (I do have a good handful of these ducks at home, so I also wanted it to fit all of my ducks). The biggest part of the open form would end up being the bowl the ducks would be set inside. The bowl needed to be about 4" tall and 6" wide. While I had been making my mug, I decided that going the slab route wouldn't give me the look I wanted for this project. My mug had ended up being a hard form, also tougher to manipulate to create soft edges.
I wanted the bowl for my ducks to be a soft form with smooth lines; I wanted an organic feel about the piece. So, when I was creating the bowl, I tried initially making the whole thing as a pinch pot, but I ran into various problems with that method. I wasn't making it tall enough and it was becoming way too wide the more I tried to add height. I had considered making the entire piece a coil pot, but that would have taken more time and patience than I had.
So, I decided to start the bowl as a pinch pot, and once it was wide enough, I gained the height I needed by using the coil method. Afterwards, I took a smoothing tool and my hands to get rid of the grooves from the coils to create a completed and smooth form. Towards the end of the process before firing, I did end up creating indents throughout the bowl to give it a texture. Creating the rocks to prop up the bowl was significantly easier as it was primarily molding balls of clay to a rocklike shape and hollowing out the bottom so it wouldn't explode in the kiln. The rock shape involved creating harder edges, also I wanted each rock to be different shapes and sizes, as all of them would end up being in close proximity of each other. I wanted the vines to cover the piece, as this would be where I could incorporate most of my movement. I intentionally had the leaves hang over the edge of the bowl and grow on the inside as well.
While I was no longer having a puddle spill out of the bowl, I still wanted to try to create a dynamic feeling with the water. So, for the puddle in the bowl, I tried to recreate a ripple like effect, so it looked like the ducks would be actively swimming about when they were placed inside. I also added the small detail of the water starting to drop out of the bowl as a callback to the original design.


I was rather happy with this result and was very excited to paint it, as I felt that would really pull it all together. For this ceramic we didn't use any glaze, rather we just used acrylic paint. With the texture I had added to the bowl it would be great to dry brush over the grooves to add a little bit of depth. I wanted to keep the colors as simple as I could because the ducks that I would keep in here are rather colorful on their own. The bowl was a warm brown, and, because this whole concept felt a little whimsical from the start, I dry brushed a gold metallic paint over the bowl. That ended up making the bowl have a copper or brass type feel to it, that I ended up enjoying. Incorporating shading on the leaves, rocks, and ripples also really added depth to the piece. The contrast of the green and blue against the brown and grey really helps to move your eye around the piece. Adding the color and the shading throughout really helped make it all feel more dynamic overall. As a last-minute detail, I added moss all around, especially growing around the puddle, to give more greenery to follow besides just the vines.


While it may not be visible anymore one of the overhanging leaves had shattered when I was bringing this back to school after Easter. It had just finished drying and was moving it to my car when I noticed the missing leaf. Luckily it wasn't shattered so far into dust where it couldn't be fixed. When I came back to school, I puzzled it back together and had to color match and repaint it as best I could. It is only slightly visible as the green I used wasn't a perfect match, but all things considered this piece could have had much worse breaks.
Once I had found a groove with the process, I really enjoyed making it despite my frustrations at the start. Although once I had finished it, I realized I could have made a better spot for the bottle of glass to go, besides just resting it against the wall. When looking at the water the highlights and shadow really helped create the effect I was going for and made it more dynamic rather than static. This piece is best viewed from all sides rather than solely looking at it face on, especially because of the movement in the vines. When looking at the piece straight on though, the saturation of the blue helps to create a focal point that leads to the ducks resting on top of it. The overhanging leaves and the leaves on the inside of the bowl also point towards the puddle and the ducks, reinforcing the focal point. On the exterior of the bowl the leaves are dominant and dynamic due to how the vines wind around the bowl. When I brought the duckpond home, I put the rest of my ducks and a mini turtle I found in the pond. This created a stronger focal point than when it was only holding just 2 ducks.

Overall, this has probably been one of my favorite projects thus far, although I don't think it is the most dynamic project I've done. Now my little kitsch ducks (and mini turtle!) have a better home on my shelf in Trinketville.


Comments